
How to Get Professional-Grade Flooring Without Breaking the Bank
You’ll achieve professional-grade flooring at significant savings by choosing engineered materials like porcelain tile or engineered hardwood. These alternatives offer superior durability and moisture resistance while mimicking premium finishes. Learn basic installation techniques using essential tools like measuring equipment, cutting tools, and proper underlayment. Focus on thorough subfloor prep, precise layout planning, and proper expansion spacing. Our complete guide reveals proven strategies for flawless DIY installation success.
Key Takeaways
- Choose engineered hardwood or porcelain tile for durability and aesthetics at lower costs than traditional solid hardwood or natural stone.
- Shop during seasonal sales in late winter and early fall, utilizing price matching and store loyalty programs for maximum savings.
- Purchase 10-15% extra material through manufacturer outlets, and negotiate prices using competing vendor quotes.
- DIY installation with proper tools and techniques can save thousands in labor costs while maintaining professional quality.
- Consider discontinued styles and collections for significant discounts without compromising on material quality or performance.
Budget-Friendly Flooring Materials That Look Expensive
Several affordable flooring materials can convincingly mimic their high-end counterparts while maintaining durability and visual appeal. You’ll find engineered hardwood offering the warmth and character of solid hardwood at a fraction of the cost, featuring a real wood veneer bonded to multiple layers of plywood or fiberboard. This construction provides enhanced stability and moisture resistance compared to traditional hardwood.
Porcelain tile represents another cost-effective option that’s gained popularity for its versatility and strength. Modern manufacturing techniques allow porcelain to accurately replicate the appearance of natural stone, marble, or even wood grain patterns. You’ll benefit from its scratch-resistant surface, water resistance, and minimal maintenance requirements. Both materials deliver professional-grade performance while helping you stay within budget constraints.
Essential Tools and Supplies for DIY Installation
Gathering the right tools and supplies before starting your flooring installation contributes to a smoother, more professional outcome. You’ll need to invest in quality tools and maintain them properly throughout your project. Don’t forget essential safety gear like knee pads, safety glasses, and work gloves to protect yourself during installation.
- Measuring and layout tools: tape measure, chalk line, speed square, and pencils
- Cutting equipment: circular saw with appropriate blade, jigsaw, and utility knife
- Installation tools: tapping block, pull bar, spacers, and rubber mallet
- Surface prep materials: floor leveler, moisture barrier, and underlayment
- Tool maintenance supplies: blade lubricant, cleaning cloths, and storage containers
Keep your workspace organized and your tools clean for peak performance and safety. Regular tool maintenance guarantees precise cuts and professional results.
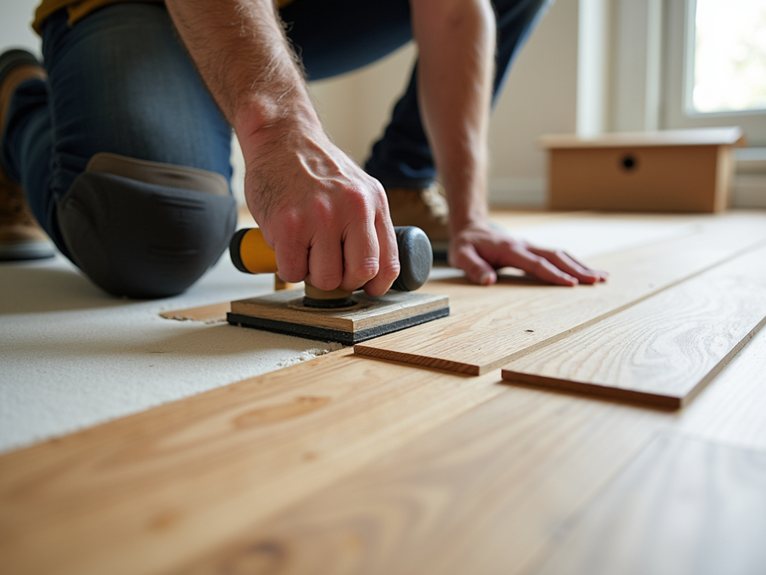
Step-by-Step Installation Techniques for Perfect Results
Perfecting proper installation techniques guarantees your flooring project achieves professional-grade results. Begin with thorough layout planning, measuring your room’s dimensions and marking reference lines to make certain straight, aligned rows. You’ll need to calculate the ideal starting point to avoid narrow pieces along walls.
Always maintain proper expansion spacing around the perimeter using spacers, typically 1/4 to 3/8 inch, to allow for natural material movement. Work systematically across the room, checking each board’s fit before securing it. When cutting pieces, measure twice and mark clearly to prevent waste. For doorways and thresholds, create precise cuts using a jamb saw to make certain flooring slides smoothly underneath door frames. Remember to stagger end joints between rows by at least 6 inches to enhance structural stability and visual appeal.
Smart Money-Saving Tips When Shopping for Flooring
While shopping for professional-grade flooring can strain your budget, you’ll find significant savings by implementing strategic purchasing tactics. Take advantage of price-matching policies at major retailers and use cashback programs through your credit card or store loyalty memberships to maximize value.
- Monitor seasonal sales cycles and clearance events, particularly during late winter and early fall, when retailers typically discount flooring
- Purchase 10-15% more material than measured square footage to account for cuts and potential future repairs
- Source materials directly from manufacturer outlets or authorized distributors to bypass retail markup
- Request quotes from multiple vendors and use competing offers as negotiation bargaining power
- Consider slightly imperfect or discontinued styles that meet safety standards but sell at steep discounts
Your strategic approach to flooring purchases will guarantee professional results while maintaining fiscal responsibility.
Common Mistakes to Avoid During DIY Floor Installation
Despite the appeal of saving money through DIY installation, inexperienced homeowners often make critical errors that compromise their flooring’s integrity and longevity. These mistakes can lead to warranty voiding and potential code violations that’ll require costly professional repairs.
You’ll need to carefully evaluate your skill level before attempting installation. If you’re uncertain about any step, particularly those involving structural elements or moisture barriers, it’s safer to consult a professional. Remember that improper installation techniques can compromise your home’s safety and result in expensive repairs down the line.
Frequently Asked Questions
Can I Install New Flooring Over Existing Tile Without Removing It First?
You can install over tile if it’s stable and level. First, check for moisture barriers and complete subfloor prep, including filling grout lines and securing any loose tiles.
How Long Should I Wait Before Moving Furniture Onto Newly Installed Floors?
Like watching paint dry, you’ll need patience. Wait 24-48 hours for adhesive cure time, then use furniture pads before moving items back. Heavy pieces should wait 72 hours for maximum safety.
Which Flooring Options Are Best for Homes With Pets and Children?
Choose luxury vinyl planks or laminate with scratch-resistant finishes for durability. You’ll want anti-slip surfaces in porcelain tile for bathrooms. Consider engineered hardwood with aluminum oxide coating for high-traffic areas.
How Do Seasonal Temperature Changes Affect Different Types of Flooring Materials?
Wood floors can expand or contract up to 1/16 inch per foot. You’ll notice seasonal cupping in humid summers, while winter’s dry air causes gaps. Vinyl and tile remain more dimensionally stable year-round.
What’s the Average Lifespan of Professional-Grade Flooring Compared to Budget Alternatives?
You’ll find professional-grade flooring lasts 20-30 years with proper care, while budget options typically last 5-15 years. Check Durability Ratings and Warranty Comparison details to verify manufacturer-specific lifespans.
Conclusion
You’ll find that professional-grade flooring doesn’t require premium prices when you select cost-effective materials, learn proper installation techniques, and employ smart shopping strategies. By avoiding common DIY pitfalls, choosing quality tools, and following precise installation methods, you can achieve stunning results that rival expensive installations. Whether you’re installing laminate, vinyl, or engineered hardwood, these principles guarantee durability, beauty, and significant cost savings.


